Using OpenSSL to Create and Upload Certificates to TM-Printers
RELATES TO:
This document details a simple process to create and upload a certificate to the following products/interfaces:
- TM-T88VI-iUIB, TM-T88VI-iHub
- TM-m30
- TM-P80, TM-P60, TM-P20
- UB-E04, UB-R04
This guide was produced using a TM-m30 printer with Google Chrome 55 running on Ubuntu Linux 16.04 LTS.
The problem:
The listed TM-Printers require all cryptography objects to be bundled as a single archive file. This is achieved using the “PKCS #12” archive file format to collect the multiple data files together.
This guide presents a simple repackaging of the private key and certificate into the required archive format.
Background:
In recent years, the creators of web browsers have worked to make their offerings more secure. In regard to HTTPS, the goal was not only to make the requirements more stringent but also to make users less likely to simply ‘click through’ errors, making themselves more vulnerable to security problems. Often, it may be necessary to upload customised cryptography objects to the printer to ensure not only security, but also compatibility with modern browsers
The following procedure is an example of a PKCS #12 archive creation, upload and select. This can be especially useful for complex scenarios, such as where certificates are signed as part of a trust chain: the entire chain can be included within the archive.
|
This is not a guide to OpenSSL and the systems integrator should make appropriate security arrangements of their own. |
Solution:
The below steps will generate keys and certificates, package them in a PKCS#12 archive, upload them to the printer and select them in WebConfig.
-
Generate a Private Key and Certificate
The following line generates a key and a signed certificate, packaged in an output .pem file which contains both key and certificate.
openssl req -x509 -nodes -days 365 -newkey rsa:1024 -keyout mycert.pem -out mycert.pem
The command will interactively prompt the user for input. Pay particular attention to the CommonName, as this must be match the root domain for the printer being installed.
-
Repackage the Certificate as a PKCS #12 Archive
The line below will repackage the .pem file as a PKCS #12 archive.
openssl pkcs12 -export -out mycert.pfx -in mycert.pem -name My Certificate
This will require the user to input a password. Make a note of this, as it will be required below.
-
Upload the Certificate to the Printer
Log in to the printer WebConfig by entering the IP address of the printer in a browser.
 Note:
Note:This may require bypassing of security warnings, see article: Fixing TM-Reciept WebConfig “Privacy Error” under Windows
- Select Certificate Import under the subheading SSL/TLS on the left-hand navigation bar. The view should be similar to figure 1.
Figure 1
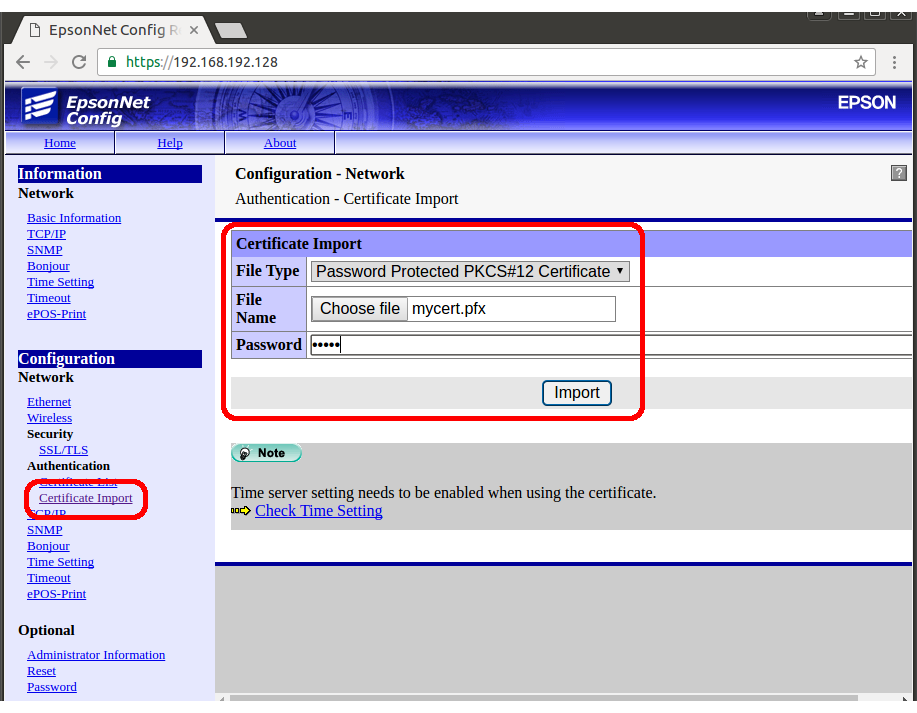
- Select as File Type Password Protected PKCS#12 Certificate.
- Press choose file and select your .pfx file.
- In password, input the password generated in step 2.
- Press Import.
- When prompted, press reset.
- Wait for the printer to reset. If necessary, refresh the browser window and/or log in to WebConfig via the browser.
- Select Certificate Import under the subheading SSL/TLS on the left-hand navigation bar. The view should be similar to figure 1.
-
Select Self-Signed Certificate on Printer
The next step is to select the uploaded certificate.
- Select Certificate List under the subheading SSL/TLS on the left-hand navigation bar. The view should be similar to figure 2.
Figure 2
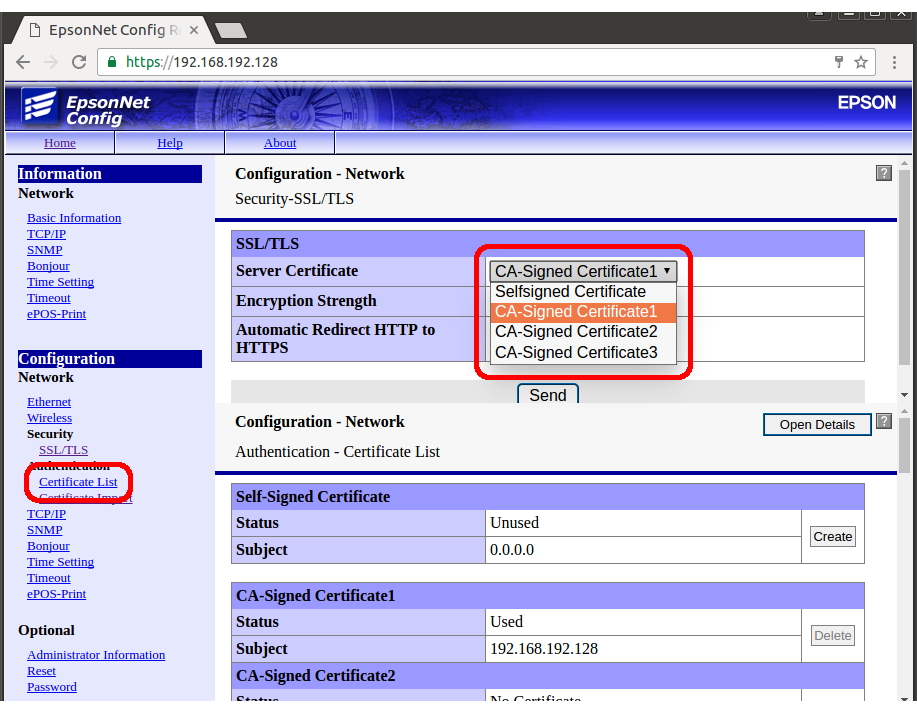
- Select Server Certificate as CA-Signed Certificate 1/2 or 3 (select as appropriate).
 Note:
Note:The certificates in each position can be viewed through the open details button.
- Press Send.
- When prompted, press Reset.
- Wait for the printer to reset. If necessary, refresh the browser window and/or log in to WebConfig via the browser.
- Select Certificate List under the subheading SSL/TLS on the left-hand navigation bar. The view should be similar to figure 2.
-
Check the certificate has been applied
The next step is to view the certificate used by the printer. Instructions here are for Chrome, for other browsers see Appendix.
- Click the padlock in the URL bar. The view should be similar to figure 3. Press Details to reveal the Security Overview side panel.
Figure 3

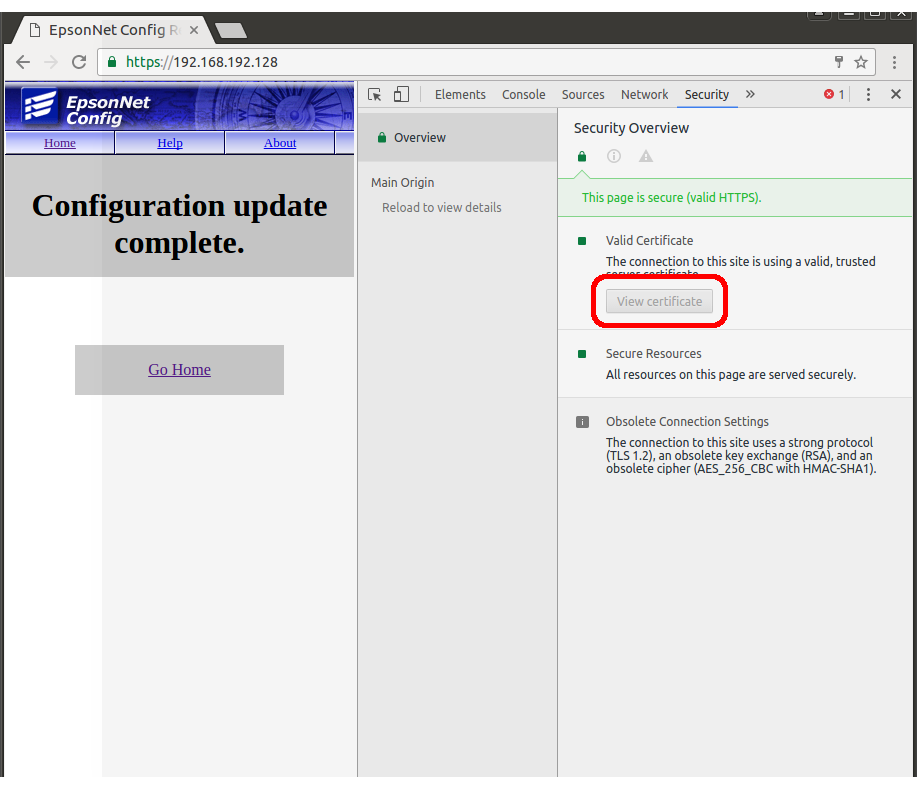
- Select View certificate under the Security Overview side panel, as highlighted in figure 4. This will bring up the certificate details.
Figure 4
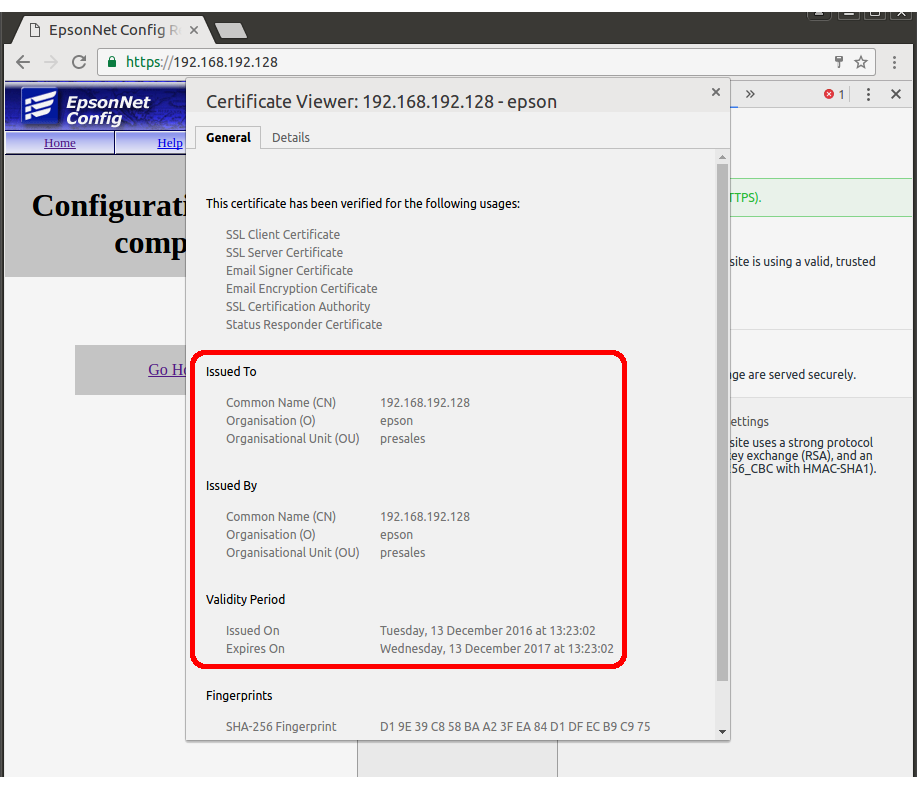
- Review the data, as highlighted in figure 5. Check this is as specified in the certificate generated in step 1.
Figure 5
- Click the padlock in the URL bar. The view should be similar to figure 3. Press Details to reveal the Security Overview side panel.
